This post may contain affiliate links. Please read our disclosure policy.
Do you want to spruce up your cuisine with a lot of flavor and fragrance? You know how essential herbs are if you’re one of those folks who enjoys cooking.
Herbs are a great way to add flavor to everyday dishes. They can transform familiar foods into new flavors and colors.
While fresh herbs are wonderful, dried herbs are convenient to keep on hand and use, and their concentrated flavor is a surefire way to transform an ordinary dish into something extraordinary. There are several simple methods for learning How to Store Dry Herbs Properly.
“Herbs are the friend of the physician and the pride of cooks”

Six Easy Steps for Storing Dry Herb Properly
Whole Herbs Have a Longer Shelf Life
The first thing to consider is that herbs last longer in their whole form. You will get a much fresher and stronger product if you can store the whole herb and then grind it as needed.
Crushing herb leaves releases essential oils into the air by breaking open the tiny cells that hold them. The air carries away the essential oils, resulting in flavorless herbs.
Ensure that Your Herbs are Completely Dried
It’s crucial to make sure that dried herbs are completely dry before preparing to store them.
This holds true if you pick fresh herbs from your backyard and later dry them for use.
Moisture can cause mold if herbs are not completely dry.
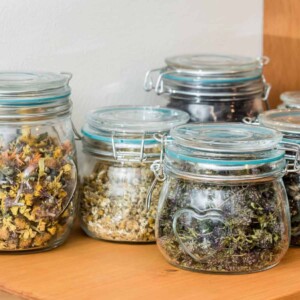
Store in Airtight Containers
Herbs will deteriorate over time if exposed to oxygen; therefore, it’s best to store dry herbs in sealed containers.
Jars with clamp-on lips and glass or metal tins with screw-top lids also work nicely.
If you can, avoid using plastic because it could contaminate your herbs with toxins.
Keep Away from Direct Sunlight
While the sun’s rays may appear to be beautiful in your herb jars, they are actually reducing the potency of the herbs.
As a result, they should be kept out of direct sunlight. Dark-colored glass jars, in fact, are even more effective at blocking all potential light.
Keep them in a closed cabinet or, if necessary, cover them with a curtain.
Store Dried Herbs in a Cool, Dry Place
It’s convenient to keep herbs in the kitchen cabinet next to the stove, but it’s not ideal for their shelf life.
Changing temperatures, as well as constant warm or hot temperatures, cause your herbs’ flavors to fade prematurely.
Be Sure to Label Harvest or Purchase Date
It’s important to make a habit of keeping track of how old your herbs are.
Label each new herb you add to the shelf with its name and the date it was gathered or purchased.
Enchanting Nature in Your Kitchen

How to Store Pantry Essentials Properly
Learn how to store flour, sugar, pasta, beans, and other staples even if you don’t have a pantry!
- White Flour: Most flour, such as all-purpose, bread, or cake flour, will last six to twelve months if stored at room temperature in an airtight container or in the original packaging inside a zip-top bag.
- Sugar: All types stored are at room temperature in airtight containers. Brown sugar is particularly susceptible to moisture and has a somewhat shorter lifespan.
- Grains: Any airtight container will work just fine, but if your cabinets get hot, round containers will allow air to circulate more easily between them (which will help the contents stay cool).With exception, brown rice has a limited shelf life since it contains oils, which can go rancid like whole-grain flour.
- Dried Beans: They should be stored in airtight jars at room temperature for a year.
- Pasta: Dried pasta can be stored properly for up to two years in a cool, moisture-free cupboard or pantry.
- Nuts: Stored in the refrigerator because they contain oils, making them prone to rancidity. If you’re going to use your nuts soon, simply store them in an airtight container and consume them within a couple of weeks.
Interesting Tips for Storing Dried Herbs
To test the freshness of your dried herbs, crush them in your palm. They’re great if you notice a strong herb scent and will continue to add flavor.
Herbs have different shelf lives, ranging from one to three years depending on the herb. While properly dried and stored herbs will never go bad, they will lose potency over time and should be replaced.
Make use of entire herbs, such as bay leaves, at the beginning of cooking because it takes longer for the taste to develop while they are whole. The aroma is released when the herb leaves are chopped because the cells are split open. It’s better to use chopped herbs right before serving.
Frequently Asked Questions (FAQs):
It depends according to the herb you choose. Use 1 teaspoon of the dried herb in place of 3 teaspoons (or 1 tablespoon) of fresh basil, dill, tarragon, or thyme. Use 1 teaspoon of the dried herb in place of 2 teaspoons of fresh marjoram, mint, oregano, rosemary, or sage in your recipe.
Yes! The freezer’s constant cold temperature will definitely keep dried herbs fresh and tasty for longer. Just be cautious when transferring herbs from the freezer to room temperature to avoid condensation in the container.
Spices and herbs are fragrant natural products that are used to flavor food. Spices are the dried seeds, buds, fruit, flower parts, bark, or roots of tropical plants. Herbs are plant leaves and sometimes flowers that are typically grown in Mediterranean climates.
More Hacks to Try:
- How To Store Celery?
- How to Store Lemon and Lime for 3 Months
- How To Store Spinach For One Month?
- How to Clean & Store Veggies to Stay Fresh
- How to Peel, Grate, and Chop Fresh Ginger
- How to Make Oat Flour
- How To Reheat Pasta Without Drying It Out?
- How To Measure Wet And Dry Ingredients!
- How to Peel Hard Boiled Eggs in Under 10 Seconds
- How To Peel Garlic In The Microwave!
How to Store Dry Herbs Properly
Equipment
- medium bowl
- glass jar
- salad spinner
Ingredients
- 3.5 ounces mint, fresh
Instructions
- First wash and dry the herb: Add the mint to a bowl of water and gently swish it around. After rinsing, you can either use a salad spinner to remove excess water before patting dry or go straight to patting dry.
- Then, allow the mint to air-dry for an additional 30 to 60 minutes before using the dehydrator.
- Second: Remove the mint leaves from the stems and set aside. Place the leaves in a single layer across your dehydrator tray, leaving enough space between them for air to circulate.
- Air drying: After rinsing and patting dry the fresh mint, arrange it in a bouquet and tie it together with twine or string at the base of the stems.
- Next, hang the bouquet somewhere warm and well-ventilated, away from direct sunlight.
- Finally, allow the mint to dry for a few days to a week, or until it is dry and 'crumbly' to the touch.
- Storage Note: You can store the dry mint leaves whole,crumbled, or powdered in a cool, dark place for up to 12 months.