This post may contain affiliate links. Please read our disclosure policy.
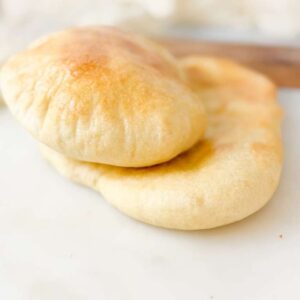
If you’ve been craving warm, soft pita bread but don’t want to turn on the oven, this Easy Air Fryer Pita Bread using 10 Minute Dough is about to become your new favorite recipe. Made with simple pantry ingredients, this homemade pita bread cooks up beautifully in the air fryer, golden on the outside, tender inside, and ready in under 30 minutes.

This recipe is perfect for anyone who wants air fryer pita bread that’s easy, fast, and reliable. The short resting time allows the dough to relax and puff, while the air fryer’s high heat creates that classic steam pocket effect. The result is soft, pillowy pita bread with just the right chew, all without long kneading or baking in a traditional oven.
What makes this recipe extra special is how practical it is. The 10-minute dough comes together quickly, making it ideal for busy weeknights or when you want fresh bread on demand. You will also love trying my Ten Minute All-Purpose Dough, Best Homemade Pizza Dough Recipe, 5 Ingredient Skillet Flatbread (Saj Bread Style), and 3 Ingredient Cloud Bread.
Use this no-oven pita bread for wraps, sandwiches, dipping, or even mini pizzas; this easy homemade pita bread fits effortlessly into any meal.
Recipe Overview
Flavor Profile: Soft, mildly yeasty, and perfectly neutral—ideal for both savory and sweet fillings
Method: High-heat air frying using quick 10-minute dough (no oven required)
Skill Level: Beginner-friendly
Occasion: Perfect for quick lunches, weeknight dinners, meal prep, or homemade sandwich nights
Texture: Light and tender with a soft interior and lightly golden exterior, designed to puff beautifully into pita pockets

Ingredients
- All-purpose flour
- Warm water
- Sugar or honey
- Pinch of salt
- Active dry yeast
- Oil (olive, avocado, or vegetable)
- Egg whites, for brushing
- Cooking oil spray
How to Make Air Fryer Pita Bread
Activate the Yeast
In a large bowl, combine warm water, sugar or honey, and yeast. Let the mixture sit for about 10 minutes, until foamy on top. This step ensures the yeast is active and ready to work.
Mix and Knead the Dough
Add flour and salt to the yeast mixture and stir until combined. Knead by hand for 2–3 minutes or use a mixer until a soft dough forms. The dough will be slightly sticky at first.
Add Oil
Slowly add in the oil while kneading until the dough becomes smoother and less sticky. You can use the dough immediately or let it rest for 30 minutes if desired (covered).
Shape the Pitas
Divide the dough into four equal balls. Working one at a time on a flat surface, use a rolling pin to gently roll each into a round, keeping the thickness even. Do not roll too thin, leave it slightly thick so it puffs up properly.
Rest After Shaping (Very Important)
Lightly spray the air fryer basket with cooking spray. Place 2–4 shaped pitas directly in the air fryer basket, not touching, and let them rest for 10–15 minutes. This step softens the dough and improves texture. It’s crucial for proper puffing.
Air Fry the Pita Bread
Lightly brush the tops with egg whites. Air fry at 400°F for 7–8 minutes, until puffed and lightly golden. Remove and cool slightly before serving.


How To Enjoy Air Fryer Pita Bread
Air fryer pita bread is incredibly versatile and pairs well with a wide range of savory, breakfast, and pizza-style toppings.
For savory meals, enjoy it with hummus and olive oil, use it to make chicken shawarma pockets, falafel sandwiches, gyro wraps, or stuff it with tuna salad or egg salad. It also works perfectly with grilled chicken and garlic sauce or beef kofta pockets for a satisfying handheld meal.
For breakfast, fill a warm pita with scrambled eggs and cheese, spread it with labneh and olive oil, or keep it simple with peanut butter and honey.
You can even turn air-fryer pita into pizza-style dishes by making mini pita pizzas, air-fryer flatbread pizzas, or crispy garlic cheese pita bread for an easy snack or appetizer.

Recipe Tips
Rest after shaping: Let the flattened pitas rest for 10–15 minutes in the air fryer basket before cooking. This step relaxes the gluten, allows air bubbles to form, and helps the bread puff properly instead of staying flat.
Even thickness matters: When pressing the dough, keep the edges from becoming too thin and avoid making the center too thick. Aim for an even thickness of about ¼ inch to ensure proper puffing, as uneven thickness leads to uneven puffing.
Adjust Thickness: For thicker pita bread, press dough less thin.
Boost browning: Brush the dough with egg whites for a lightly golden top, especially in air fryers that don’t brown easily.
Prevent sticking: Lightly spray the air fryer basket, not the dough, to prevent sticking and support better puffing.
Do not overcrowd the basket: Avoid overcrowding the air fryer basket so hot air can circulate evenly around each pita.
Cook at high heat: Pita bread relies on steam to puff. Cooking at 400°F creates a fast blast of heat that traps steam inside the dough, forcing it to inflate. Avoid low-and-slow cooking.
Watch the timing: Powerful air fryers cook faster, so start checking at minute 6 to avoid over-browning.
Storage Tips
Room temperature: Store cooled pita bread in a sealed bag or container for 1–2 days.
Refrigerator: Keep in an airtight bag or container for up to 5 days. Reheat in the air fryer at 350°F for 1–2 minutes to restore softness.
Freezer (best option): Once fully cooled, stack pitas with parchment paper between them and freeze in a freezer-safe bag for up to 2 months. Reheat directly from frozen in the air fryer at 350°F for 3–4 minutes.

Frequently Asked Questions
Yes, you can prepare the dough and refrigerate it for up to 24 hours before shaping.
All-purpose flour works best for soft, pliable pita bread. You can substitute up to 25% whole wheat flour, but the pita may be slightly denser.
Pita bread may not puff if the dough wasn’t rested after shaping, if the air fryer temperature was too low, or if the dough was pressed unevenly. Letting the shaped pitas rest for 10–15 minutes and cooking them at 400°F makes a big difference in helping them puff properly.
Yes. Egg whites help with browning, but you can skip them. Lightly brushing with oil or spraying the basket will still give good results.
More Homemade Bread Recipes

Easy Air Fryer Pita Bread (No Oven Needed)
Ingredients
- 1⅔ cups All-purpose flour
- ⅔ cups Warm water
- 1 teaspoon Sugar, or honey
- Pinch of salt
- 2 teaspoons Active dry yeast
- 1 tablespoon Oil (olive, avocado, or vegetable)
- Egg whites, for brushing
- Cooking oil spray
Instructions
- In a large bowl, combine warm water, sugar or honey, and yeast. Let the mixture sit for about 10 minutes, until foamy on top. This step ensures the yeast is active and ready to work.
- Add flour and salt to the yeast mixture and stir until combined. Knead by hand for 2–3 minutes or use a mixer until a soft dough forms. The dough will be slightly sticky at first.
- Slowly add in the oil while kneading until the dough becomes smoother and less sticky. You can use the dough immediately or let it rest for 30 minutes if desired (covered).
- Divide the dough into four equal balls. Working one at a time on a flat surface, use a rolling pin to gently roll each into a round, keeping the thickness even. Do not roll too thin, leave it slightly thick so it puffs up properly.
- Lightly spray the air fryer basket with cooking spray. Place 2–4 shaped pitas directly in the air fryer basket, not touching, and let them rest for 10–15 minutes. This step softens the doughand improves texture. It’s crucial for proper puffing.
- Lightly brush the tops with egg whites. Air fry at 400°F for 7–8 minutes, until puffed and lightly golden. Remove and cool slightly before serving.